6..3.2 Understand and use rotations (2)
Monday: This task shows a straightforward photograph of a small standard metal screw. A clockwise turn with a screwdriver will send such a screw further into the wood. It is possible to tell this from the direction of the screw's thread, though students might find it difficult to discern this and to explain how it works.
Tuesday: These photos are of the same screw as in Monday's task. If, say, we take that screw as our model we can construe it in several ways: for example, in an elevation view of the vertical screw, the screw's thread appears like a set of line segments that slope slightly downwards from right to left. This matches the threads of the screws in the middle three photos.
Alternatively, we could think of the screw as a (somewhat dangerous) helter-skelter: travelling down it, one would rotate in a clockwise direction when seen from above. Again, this would also apply to the helter-skelters in the middle three photos.
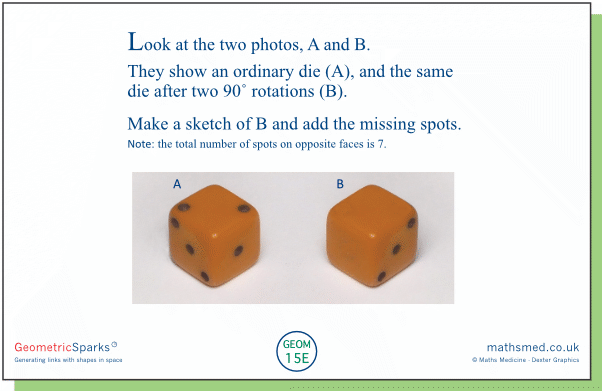
Wednesday: Here a particular 90˚ rotation is applied twice to a die. We can see from photos A and B that the rotation is about a vertical axis and in a clockwise direction when seen from above. When this is applied to the die in photo B, the right-hand vertical face showing 4 spots will become the left-hand vertical face, and will be replaced by the vertical face opposite the single spot. This will have 6 spots, since the total number of spots on opposite faces of an ordinary die is always 7. This solution is shown below the task.
Friday: This is quite a demanding task, with two solutions.
One way to get from the position in photo A to the position in B with two 90˚ rotations is this: rotate the die so that the face with 3 spots moves to the top and then moves to its position in B. The result is shown below, left. Another way is this: rotate the die about a vertical axis so that the face with 3 spots moves directly to the right, and then rotate about a horizontal axis so that the line of 3 spots slants the right way. If the second rotation is clockwise, we get the same result as before; if it is anticlockwise we get the result shown below, right.


